


Building Your First MCP Server with .NET: A Developer's Guide to Model Context Protocol
What MCP (Model Context Protocol) is and how it works? How to build your first MCP Server using .NET? How to integrate it with Cursor Code Editor?

Connecting Large Language Models (LLMs) to external services is becoming a key part of modern application development. Model Context Protocol (MCP) offers a standard way to let LLMs interact with tools and APIs, making these integrations more structured and predictable.

In this practical guide, I'll explain:
What MCP (Model Context Protocol) is and how it works
How to build your first MCP Server using .NET
How to integrate it with the Cursor code editor (- MCP Client -)
What is Model Context Protocol (MCP)?
Anthropic (who coined the term and introduced the protocol), describes it as:
The Model Context Protocol is an open standard that enables developers to build secure, two-way connections between their data sources and AI-powered tools. The architecture is straightforward: developers can either expose their data through MCP servers or build AI applications (MCP clients) that connect to these servers.
TL;DR: MCP is a protocol that enables AI models to interact with internal/external tools, data, and APIs through standardized interfaces. The protocol's architecture consists of MCP Servers and MCP Clients, which we'll explore in the next sections.
MCP Architecture
The following diagram illustrates the general architecture of MCP:

As shown in the diagram, MCP extends LLMs' capabilities by connecting them to external tools and data sources, providing specialized and up-to-date data for specific use cases.
MCP architecture consists of three main components:
MCP Hosts: Applications or tools that consume MCP services (e.g., Claude Desktop, IDEs, AI tools)
MCP Servers: Specialized programs that:
Expose specific features or data
Follow MCP specifications
Provide standardized interfaces for tools and services
Common examples include:GitHub
Google Drive, Google Maps
PostgreSQL and other data sources
MCP Clients: Intermediaries that facilitate communication between Hosts and Servers by:
Connecting to one specific MCP Server
Handling message routing
Managing communication protocols
Example: Getting Current Time from MCP Server
Let's say we want to get the current time from a specific city or timezone as an example (you can use a different example for your use case, but for the sake of simplicity, we will use this example).
If you open the Chat in Cursor IDE and ask about the current time in a specific city or timezone, you will see the following:

As you can see, since the LLMs don't have a connection to the internet by default, they are unable to provide the current time for a specific city or timezone. So, we need to extend the capabilities of LLMs by adding an MCP Server that provides the current time in a specific city or timezone. Since we are using Cursor IDE, we will build an MCP Server that provides the current time in a specific city or timezone and integrate it with Cursor IDE, which is the MCP Client in our case.
Building Your First MCP Server with .NET
Let's create a simple MCP server that provides time-related functionality. We'll use the official MCP C# SDK to build the MCP Server. Here are the steps to build the MCP Server:
Step 1: Create a New Project
First, let's create a new console application:
dotnet new console -n McpTimeServer
cd McpTimeServer
Step 2: Install Required Packages
Add the necessary NuGet packages:
dotnet add package ModelContextProtocol --prerelease
dotnet add package Microsoft.Extensions.Hosting
The
ModelContextProtocolpackage gives access to new APIs to create clients that connect to MCP servers, creation of MCP servers, and AI helper libraries to integrate with LLMs throughMicrosoft.Extensions.AI.
Step 3: Implement the MCP Server
Open your Program.cs and update it with the following code:
| using Microsoft.Extensions.DependencyInjection; | |
| using Microsoft.Extensions.Hosting; | |
| var builder = Host.CreateEmptyApplicationBuilder(null); | |
| // Add MCP server | |
| builder.Services | |
| .AddMcpServer() | |
| .WithStdioServerTransport() | |
| .WithToolsFromAssembly(); | |
| var app = builder.Build(); | |
| await app.RunAsync(); |
Let's break down the server configuration of our MCP server:
AddMcpServer(): Registers MCP server services to DI containerWithStdioServerTransport(): Uses standard I/O for communicationWithToolsFromAssembly(): Automatically discovers and registers MCP tools from the related attributes. (We will create the tools in the next step, and we will use theMcpServerToolTypeattribute to mark the class as containing MCP tools.)
Now, let's create the tools that will be used by the MCP server. Create a class named TimeTools and add the following methods:
| [McpServerToolType] | |
| public static class TimeTools | |
| { | |
| [McpServerTool, Description("Gets the current time")] | |
| public static string GetCurrentTime() | |
| { | |
| return DateTimeOffset.Now.ToString(); | |
| } | |
| [McpServerTool, Description("Gets time in specific timezone")] | |
| public static string GetTimeInTimezone(string timezone) | |
| { | |
| try | |
| { | |
| var tz = TimeZoneInfo.FindSystemTimeZoneById(timezone); | |
| return TimeZoneInfo.ConvertTime(DateTimeOffset.Now, tz).ToString(); | |
| } | |
| catch | |
| { | |
| return "Invalid timezone specified"; | |
| } | |
| } | |
| } |
Here;
The
McpServerToolTypeattribute marks this class as containing MCP tools ([McpServerToolType])Each method marked with
McpServerToolbecomes available to MCP clients ([McpServerTool])
After creating the tools, we are done developing the MCP server and we can directly use it in our MCP Client (Cursor IDE, in our example).
Integrating with a MCP Client (Cursor IDE)
Now that we have our MCP server, let's configure it in Cursor IDE. Here are the steps to configure the MCP Server in Cursor IDE:
Step 1: Configure MCP Server in Cursor
To configure the MCP Server in Cursor IDE, we should go to Cursor Settings. You can do this from the top menu (File -> Preferences -> Cursor Settings) (or alternatively you can directly click the Gear icon in the top right corner of the Cursor IDE):

After opening the Cursor Settings window, you should see the MCP section. Then you can directly click the Add new global MCP server button and add the following MCP server configuration in the opening mcp.json file:
| { | |
| "mcpServers": { | |
| "timeServer": { | |
| "command": "dotnet", | |
| "args": [ | |
| "run", | |
| "--project", | |
| "path/to/your/McpTimeServer", //absolute path to the MCP server project | |
| "--no-build" | |
| ] | |
| } | |
| } | |
| } |
Step 2: Test Your MCP Server
After adding the MCP server configuration, you can save the file and go back to the MCP section in Cursor Settings, and enable the MCP Server (click to the Refresh icon, to run the MCP server):

Now, you can test your MCP server by asking about the time in a specific city or timezone:
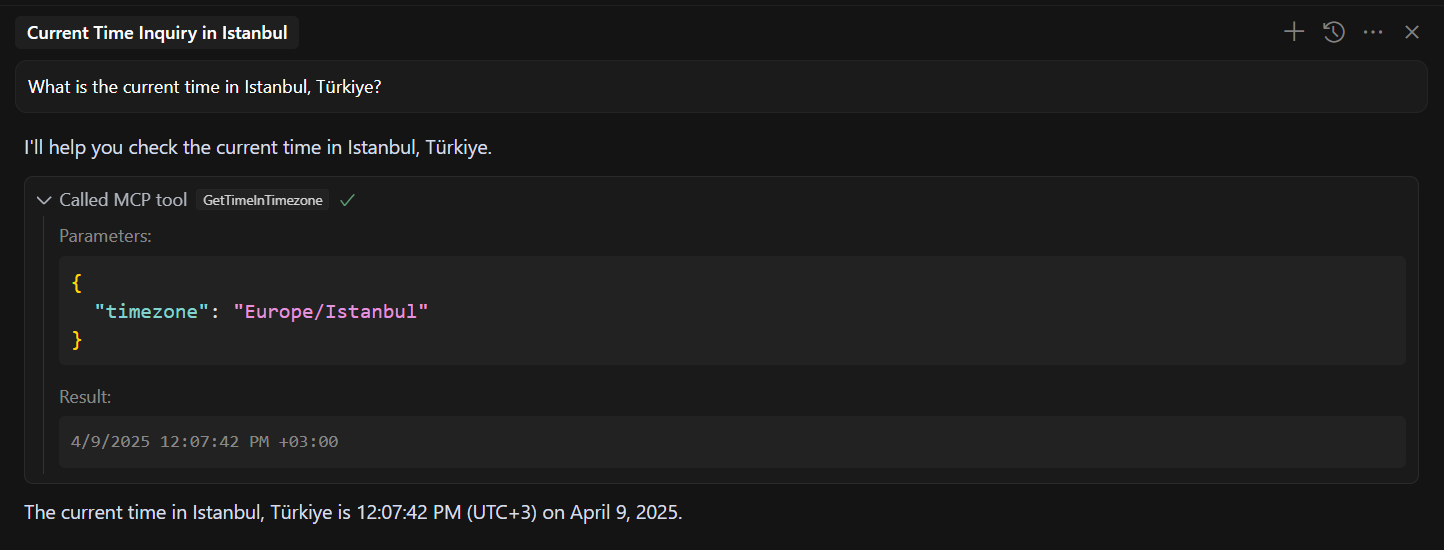
You can clearly see that, now the LLMs can provide the current time in a specific city or timezone from our MCP Server. It even shows which tool is used to provide the current time and provided value while calling the related tool.
Conclusion
The Model Context Protocol (MCP) represents a significant advancement in standardizing AI-tool interactions. Through this tutorial, you've learned how to create a basic MCP server and integrate it with Cursor IDE. This foundation can be extended to create more complex tools and services that interact seamlessly with AI models.
Thank you for the article. What about c# MCP client?