

My Takeaways from Google's Technical Writing Courses
My takeaways from Google's Technical Writing Courses (1 & 2)...

Technical writing is an important skill and I think every engineer needs to spend some time improving their writing skills. There are great free courses all over the internet and Google’s Technical Writing One and Technical Writing Two courses are just two of them.
As a software engineer, I really like writing articles. It helps me to check if I understood the related topic or if any blurry things left, so I can more focus on it. Also, it’s a really good motivation source to learn new things and try them.
By writing/reading articles frequently, I’ll get better eventually but I wanted to speed up this process and learn the core topics of technical writing.
Therefore, I started Google’s Technical Writing Courses and completed it on the same day. It is a really good course and gave me good tips to get better at writing. Therefore I wanted to share my takeaways from these courses. Without any further ado, let’s get started.
Define new or unfamiliar terms
When writing or editing, learn to recognize terms that might be unfamiliar to some or all of your target audience. If you spot an unfamiliar term, you can do the following things:
If the term already exists, link to a good existing explanation. (Don’t reinvent the wheel.)
If your document is introducing the term, define the term.
Use terms consistently
When writing an article, we should use terms consistently, which means we should not use different variations of the same word randomly in our articles.

Notice, the good sentence first uses the full term and then puts the acronym in parentheses. This is also good practice.
Don’t use “this” and “that” if it’s not clear what they refer to
To help readers, avoid using this or that in ways where it’s not clear what they refer to. Use either of the following tactics to clarify ambiguous uses of this and that:
Replace this or that with the appropriate noun.
Place a noun immediately after this or that.
Active voice vs passive voice
Tip: The vast majority of sentences in technical writing should be in active voice.
Use active voices over passive voices, whenever possible. Consider the following sentences, which one is clearer?
The player kicks the soccer ball. ->
active voice(Good ✅) The soccer ball is kicked by the player. ->passive voice(Bad ❌)
While revising an article and finalizing it, find the passive voices and try to convert them to active voices.
For example: Assume you have a sentence like “Code is interpreted by Python, but code is compiled by C++.”, you can convert it to an active voice like “Python interprets code, but C++ compiles code.”
Active voice provides the following advantages:
Readers mostly convert passive voice to active voice in their own mind. Therefore, instead of giving your readers extra processing time, stick to active voice, so readers read straightly.
Active voice is generally shorter than passive voice. You can see the above examples for instance.
Choose strong verbs
Pick the right verb and the rest of the sentence will take care of itself.
Reduce imprecise, weak, or generic verbs, such as the following:
forms of be: is, are, am, was, were, etc.
occur
happen
Example:
“The exception occurs when dividing by zero.”
We can change this sentence and use a stronger verb like raises instead of occurs
“Dividing by zero raises the exception.”
Reduce “there is” / “there are”
Reducing the there is/are statements makes a sentence clear:

Use short sentences if possible
Shorter sentences communicate more powerfully than long sentences and are usually easier to understand.
Each sentence should only focus on a single idea/topic
Focus each sentence on a single idea, thought, or concept. Just as statements in a program execute a single task, sentences should execute a single idea.
So, after you have completed an article and started revising it check the sentences and if you find more than one topic in a sentence, separate it into a new sentence.
Distinguish “that” from “which”
Use the “that” word for the essential subordinate clause and use the “which” word for the non-essential subordinate. Consider the following sentences:
Python is an interpreted language, which Guido van Rossum invented.
Fortran is perfect for mathematical calculations that don’t involve linear algebra.
In the first sentence, the “which” is used to give a piece of extra information about the context. But in the second sentence, the “that” is used to bind the two related things and these are highly coupled to each other.
Tip: Place a comma before which; do not place a comma before that.
Choose the correct type of list
There are three types of lists:
bulleted list
numbered list
embedded list
Use a bulleted list for unordered items; use a numbered list for ordered items and use an embedded list for items within a sentence.
Generally speaking, embedded lists are a poor way to present technical information. Try to transform embedded lists into either bulleted lists or numbered lists.
Start numbered list items with imperative verbs
Consider starting all items in a numbered list with an imperative verb. An imperative verb is a command, such as open or start.
Example:
Download the A app from Google Play.
Configure the A app’s settings.
Start the app.
Introduce each list and table
Introducing each list and table with a sentence that tells readers what the list or table represents is a good practice. Place a colon rather than a period after the introductory sentence.
Using the following word is recommended to put into the introductory sentence.
For example: “Take the following steps to install our application:”.
Do not make paragraphs too long or too short
Long paragraphs are visually intimidating. When revising, consider dividing a very long paragraph into two separate paragraphs.
Conversely, don’t make paragraphs too short. If your document contains plenty of one-sentence paragraphs, your organization is probably faulty.
Tip: Readers generally welcome paragraphs containing three to five sentences, but will avoid paragraphs containing more than about seven sentences.
Answer “what”, “why” and “how” questions
To write a good article, you should answer the following three questions:
What are you trying to tell your reader?
Why is it important for the reader to know this?
How should the reader use this knowledge?
Focus on your audiences
Make sure your document provides the information that your audience needs but doesn’t already have. Take the following actions:
Define your audience.
Determine what your audience needs to learn.
Fit documentation to your audience.
Prefer simple words and avoid idioms
Most of the audiences are more comfortable in languages other than English (most of your readers, probably will be not native English speakers). Therefore, prefer simple words over complex words; avoid obsolete or overly-complex English words.
Avoid idioms because idioms are phrases whose overall meaning differs from the literal meaning of the individual words in that phrase. For example, instead of using a word like “a piece of cake”, prefer a more common word like “this task is done”.
Self-editing
In most cases, working towards a final published document is an iterative process. Transforming a blank page into a first draft is often the hardest step. After creating the first draft, revise the documentation and try to make it better.
You can use the following list as a checklist:
Use active voice over passive voice.
Format sequential steps as numbered lists.
Format most other lists as bulleted lists.
Refer to your audience as “you” rather than “we”. This is really important, stick with the referring and be consistent about it.
Format code-related text as code font.
Place conditional clauses before an instruction, rather than after.
Break long sentences into shorter sentences or lists.
Step back and try to read your draft from your audiences’ point of view.
Read it out loud. Check for awkward phrasings, too-long sentences, and anything else that doesn’t fit in your documentation.
After you write your first draft, set it aside. Come back to it after an hour (or two or three) and try to read it with fresh eyes.
Organizing large documents
Before starting to write an article straight, it might be a good idea to outline the document first.
Outline a document
Starting with a structured, high-level outline can help you group topics and determine where more detail is needed. The outline helps you move topics around before you get down to writing.
You can use the following tips for outlining documentation:
Before you ask your readers to perform a task, explain to them why they are doing it.
Structure your outline so that your document introduces information when it’s most relevant to your reader.
Consider explaining a concept and then demonstrating how the reader can apply it either in a sample project or in their own work and if possible provide alternatives.
You can see an example outline of a document in the image below:

I took the outline from an old GitHub issue. You can check it out here.
Introduce a document
If readers of your documentation can’t find relevance in the subject, they are likely to ignore it. To set the ground rules for your users, include the following information in your documentation:
What does the document cover?
What prior knowledge do you expect readers to have?
What the document doesn’t cover?
Remember that you want to keep your documentation easy to maintain, so don’t try to cover everything in the introduction.
Add navigation
Providing navigation and signposting for your readers ensures they can find what they are looking for and the information they need to get unstuck.
Clear navigation includes introduction and summary sections, a table of contents, and links to what you learn next.
Prefer task-based headings
Choose a heading that describes the task your reader is working on. Avoid headings that rely on unfamiliar terminology or tools.
For examples:
Running the command
Initializing the project
Installing the library
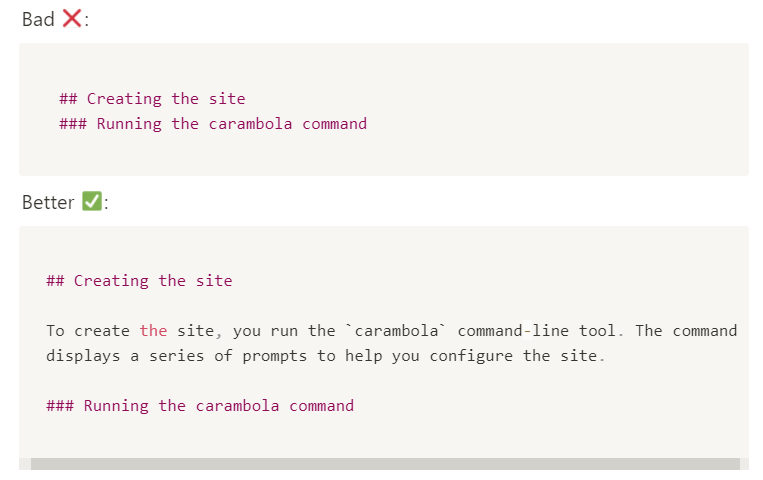
Provide text under each heading
Most readers appreciate at least a brief introduction under each heading to provide some context. Avoid placing a level three heading immediately after a level two heading, as in the image above:
Illustrating
Good graphics engage readers in ways that text can’t. Thus, take benefit of images if possible.
It is often helpful to write the caption before creating the illustration. Then, create the illustration that best represents the caption. This process helps you to check that the illustration matches the goal.
Prefer adding simple illustrations rather than complex ones and highlighting the important point in the illustration within a sentence, if possible.
Creating sample code
Good sample code is often the best documentation. Even if your paragraphs and lists are as clear as blue water, programmers still prefer good sample code.
Good samples are correct and concise code that your readers can quickly understand and easily reuse with minimal side effects.
A sample code should meet the following criteria:
Build without errors.
Perform the task it claims to perform.
Be as production-ready as possible. For example, the code shouldn’t contain any security vulnerabilities.
Follow language-specific conventions.
Should be short, including only essential components.
Class, method, and variable names should be descriptive.
Should be avoided for deeply nested code.
Avoid writing comments about obvious code, but remember that what is obvious to you (the expert) might not be obvious to newcomers.
Good documents explain how to run sample code and the prerequisites for running the code.
Also, writers should consider describing the expected output or result of sample code, especially for sample code that is difficult to run.
Summary
Before ending this article, I want to list some tips that I took note during these two technical writing courses:
Be consistent about terms, words and acronyms.
Think like your audience.
Read documents out loud.
Revise documents after the first draft (also, for the second and third ones).
Outline a document before start writing it.
Prefer task-based headings.
Consider writing the caption before creating the illustration.
Create concise sample code that is easy to understand.
Avoid writing comments about obvious code.
Provide not only examples but also anti-examples.
Prefer simple words
Answer “what”, “why” and “how” questions
Introduce each list and table
…
Conclusion
I highly recommend these courses, if you are considering improving your writing skills. It provides good tips and I hope it improves my writing skills and helps me to well organize my further articles.
Thanks for reading the article. I hope you find it useful. And see you at the next one :)